Developed by Guillaume Gete, Lion DiskMaker allows users to make bootable DVDs/USB flash drive/SD card of OS X Lion in a few outstandingly simple steps.
All you are required to do is ensure that the OS X Lion file you downloaded from the Mac App Store is in the /Applications folder.
The program asks the user if they want to create a bootable DVD or a flash drive; once they’ve decided the media, the app does the rest!
Another great advantage of this app is how you can use a 4GB flash drive instead of the previously minimum 8GB one.
From the official website:
Lion DiskMaker is a small application programmed with AppleScript that you can use with Mac OS X 10.6 or 10.7 to burn a DVD or build a bootable USB key from Mac OS X Lion’s Installation program.
As soon as you launch the application, it checks the presence of Mac OS X Lion Install in the /Applications folder, or tries to find one using Spotlight. Then, it proposes to build a DVD or create a USB bootable install disk.
Now that we’ve mentioned its good side, let’s talk a little about its limitation: Lion DiskMaker will not work if you’re on a Mac with OS X Lion pre-installed (like the new MacBook Air).
If you don’t have a copy of Lion available (the file is erased automatically when you move from Snow Leopard to Lion), you will have to download it again by opening up its page on Mac App Store and then pressing the Option/Alt key. This will allow you to download Lion again.
Lion DiscMaker is a free application and can be download from the link embedded below.
Hot on the heels of the 4.3.3 update for Apple tv, iCloud has just gone live with pricing details.
Apple iCloud Pricing
Along with launching the new beta service, Apple has also revealed its pricing strategy for additional storage on the cloud service. Apple will charge $20 for 10GB, $40 for 20GB and $100 for 50GB a year.
iCloud is Apple’s take on the cloud service. After lambasting employees over the failure of MobileMe, Apple is looking to get it right with iCloud. With Apple revealing the new service for the first time, it would indicate that the service is nearing public availability.
There have been many rumors about when the new service will go live. It is believed that the service will be launched along side the iPhone 5 which will hit retail later this fall. It is unclear if the new device will launch in September or November.
For those who are waiting anxiously for Apple’s latest service, this is a step in the right direction. With iCloud, Apple will kick off its cloud based service that offers many features to entice the user into placing their trust in Apple for securing their personal content.
Apple has just made some back-end changes to the iTunes Store cloud as the new iOS 4.3.3 firmware updated for Apple TV went live a couple of minutes ago.
As demonstrated above you cano now re-download any perviously purchased tv shows in iTunes. You can still rent tv shows from the Cupertino giant alonside this new features and comes on top of the options to already re-download purchased apps, e-books and music in desktop iTunes.
Sometimes the simplest of tasks can just be a major pain in the ass. Posting a screen shot from your desktop and posting on forum involves enough steps to warrant not bothering at times. Normally it’s a case of
Capture Screen
Ftp Image or goto website, upload image and then grab the image link grab link
In steps TinyGrab 2.0 with a premise to make all this simple. Using a simple keyboard combination, TinyGrab performs the capture and upload in one easy step. All the images are accessible shared as part of a social interaction webpage where comments can be left. So it’s not quite a Capture, Upload, Link to blog tool but a different take on sharing screen captures.
TinyGrab Account Types
TinyGrab resides in the menu bar waiting for either a combination press or a manual choice of capturing a screen area and after creating your account, putting in details to the app, you are ready to start screen capturing. With the screen capture you are limited to use defined areas so you can’t grab a complete window by clicking on it unlike the built in Grab application on IOS.
Once you’ve captured part of the desktop you get the chance to name your snapshot, add a description and upload to your TinyGrab account. You can upload to your own FTP server as well as the default TinyGrab servers.
It’s as simple as that, hitting save brings a nice upload bar underneath the TinyGrab icon showing you the upload status which blends in with the desktop feeling.
TinyGrab 2.0 uploading bar
Accessing your grabs
Once uploaded your grabs are situated in your web control panel. There is a delay from upload to items being showing the control panel view which, I presume, is down to some pre processing for the thumbnails. Pictures and collection management is best summed up a simplified Google Picasa experience.
TinyGrab Control Panel
Screen grabs and manual uploads are shared in a social context rather than a hotlink to the image itself. For example http://grab.by/aDRg takes you to a view of the picture alongside the ability to enter comments as well. Comments can only be left if you have a pro version of the software. As you can see by the url, links are shortened for a Twitter friendly length.
Those looking for simplified upload and share on blog features are going to be disappointed at this point in the review. Sharing your photo’s to the outside word is apparent from the outset but as mentioned earlier you can upload to your own servers if you wish.
“You can use TinyGrab to host images for your blog through hotlinking. Please be aware though that TinyGrab is intended for simple screenshot sharing, not as an image host/alternative to save your site’s server bill. We ask kindly that you do not abuse this feature, if you do you may find your account and service terminated.”
Stability Issues?
The developers themselves have noted some stability issues and these are blatantly apparent unfortunately. It “could” just be my Lion setup but never have I experienced app crashes, high cpu usage and then complete network connection take-down at times on this sort of level. None the less it remained stable enough at times to get a feel for the program.
Overall I had hoped this would be more aimed toward bloggers in general with the ability to hotlink to images and such. A previous favorite of mine, Imagewell, became all bloaty and TinyGrab fills the niche area of capture and upload with ease.
If you take the bugs and performance issues at times, Tinygrab is a great tool for simple screen capturing, uploading and has great potential to come.
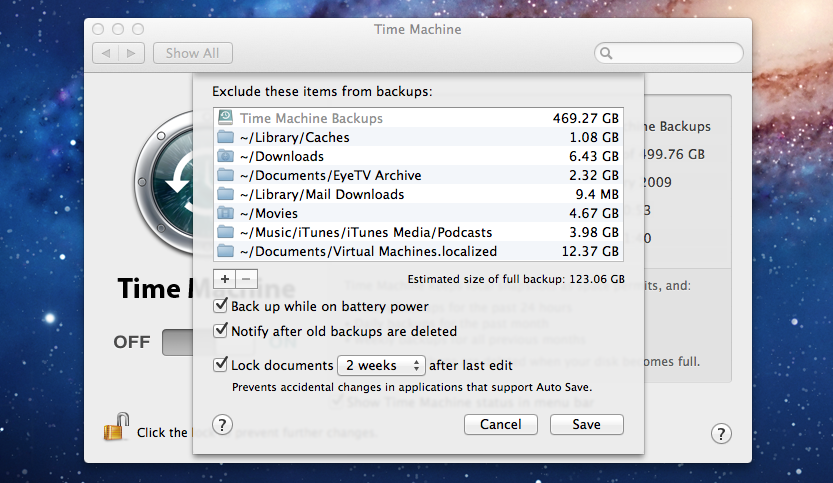
Easier than you might think but why would you want to delete items, folders from Time machine.
Just recently whilst testing Eye TV and the Equinux Tizi I made the mistake of putting recorded TV shows in my documents folder. This was getting backed up each and every time. Once I’d watched them I was deleting them so it was became a good idea to delete unwanted guff from my Time Machine.
Go to the top level — the first window; the one with your hard drive.
Navigate to the backup you want to delete and use the Actions menu (gear icon) in the Finder’s toolbar. It has an option to delete the backup. Also, when using the Actions menu, with a file or folder selected, there is an option to delete all instances of the file/folder from all backups.
You can right click and delete all instances as well.
If you have any Time Machine hints and tips please Yell US! or use the form below.
Having never really used Time Machine before now I thought it was high time that I put the spare HDD I have lying about to use. Well more like I’m debating formatting my system to do a clean install of Lion and wanted a local backup for a change. I’ve also included updated information for what folders to exclude from Mavericks and Yosemite backups.
This came about when trying to reduce the size of my time machine backups. Most of the things I wanted to exclude were in /library but in finder it has mysteriously vanished.
So here’s how you get your Library Folder back in Lion’s finder.
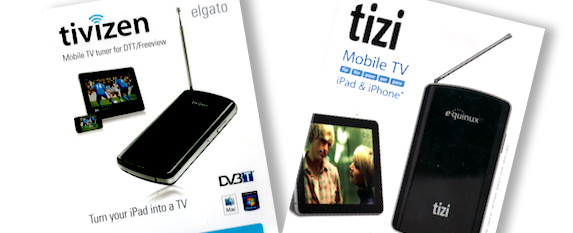
In an article that’s long overdue we are putting the Elgato Tivizen and the Equinux Tizi head to head in this exclusive article.
Seeing as the hardware under the hood is exactly the same we are going to focus on the user experience, breaking it down into the following categories.
I thought that it was just me and that Apple servers had singled me out for looking so dishevelled all the time stopping me from using FaceTime to protect the world from me. However it seems that I’m not alone in the world and many Lion users are getting the following error message.
“The server encountered an error processing registration please try again later”
In the interests of being thorough with our research we like to make sure we are getting the best deals before purchasing any software. Yup, thats right, we have to purchase our own apps and gizmos so that we can truely remain in the spirit of reviwing without having to keep sponsors happy.
It’s been a busy week in the Apple camp. First there was Lion, the Macbook being dropped and today we have what Apple calls the “World’s First Thunderbolt Display”. The 27-inch Thunderbolt Display has an LED-backlit, 2560-by-1440 pixel, 16:9, in-plane swtiching (IPS) screen, which Apple says has a brightness of 375 cd/m2 and a 1000:1 contrast ratio.
As gadgets go, I have to admit, that when I saw this little gem floating around on other review websites, I had to get it for myself and give it a thorough shake down. Personally to me some of the other reviews dedicate a few paragraphs, which are no way near enough for what this device can do and being honest, those other reviews miss out quite a few key important facts. So when the good people at Equinux offered me a loan of a unit I jumped at the chance and I have been reviewing this for the last few weeks.
Remember the days of walking down the road with a ghetto blaster? Well I have been doing the new age version of that, walking down the road with my iPhone and the portable TV tuner 😀 Also, and I don’t recommend this, with the help of a colleague we conducted our very own driving a car whilst watching FreeView test. So in short we tried to make this review as real-world as possible like we do with most of our reviews.
Setting up the Tizi.
This really coldnt be easier. Download the Tizi application from the App store and run it. Turn on the Tizi, connect to it’s own hotspot (wireless security is available) and the box will start scanning for signals in your area.
Our first attempt at a scan failed miserabley! This was no surprise as I barely get a signal with a boosted roof top aerial, so to remove the ever present issue of having a questionable tv signal, we jumped in the car and less than a minute later find ourselves with a nice strong signal. The Tizi started to do it’s channel scan and ended up picking up 67 channels which in my location merits an impressive result.
It’s at this time we found a massive bug bear of this product, okay maybe not a problem, perhaps it’s by design, you can’t use your own external TV aerial. Yes that’s right you have no option whatsoever to use your household aerial, portable aerial or anything other than the small built-in aerial that comes with the hardware. If you are savvy enough you could use the end of a household aerial connector and with a bit of fiddling get a signal indoors for those that suffer in poor signal areas like myself.
Smart location channel scanning works by using the iPhone GPS and hooking into, we presume, a database of transmitters to find the nearest transmitter to you. If you have your location services turned off you can do a full Freeview scan, however this will take some time as it will scan all frequencies in the spectrum.
At first we thought it was a little flimsy and weak, however, as we were later to find out the flexibility was a more than a saving grace. At one stage of our testing we caught the aerial on a wall, thankfully because it’s designed to bend up to 90 degrees there was no damage. Hundreds of times better than those old telescopic extending aerials that were non-replaceable and the moment they had a chink anywhere in them you were left waiting for an inevitable snap and a useless TV tuner. It’s at this point you realise the whole package hasn’t just been cobbled together, there is a definite sense of feeling that designers have worked alongside engineers to make sure that the whole, user interface experience is intuitive and simple from the out of the box moment.
So let’s get on with doing every unemployed persons favourite hobby, watching daytime television.
Navigating Channels
Tizi EPG showing you channels, whats on now and next
As you can see from the images, a small display of your current channel is at the top and below is a mini guide which you can scroll up and down to see what is on. Clicking on the small circle with the arrow reveals a small synopsis of what’s showing now and sliding to the left shows you the next program details. All the information is provided OTA (over the air) a neat touch to the intuatitve interface. Basic yes.. functional, definitely!
The blue bars you see under the channel logo represent how much of the program has played through already.
It might have been during updates for the guide, having too many open apps or our iPhone 4 still running on iOS 4.2, but we noticed considerable scrolling lag going up and down the EPG, all areas of the GUI were just fine, so it’s probably just a combination of doing a scan and updating the interface that takes its one time only toll on the system. Further EPG update didn’t seem to affect performance at all.
Some people are right to levy criticism at the fact that you can only see now and next programs, but then you would really have to ask the question, is this device really designed to be a portable DVR or just a portable TV viewer with an option to record programmes built-in?
Watching TV with Tizi
Quality wise it’s what you would expect from watching a video on an iOS device and freeview. Running at a full 25fps any transitions or panning shots were smooth with no issues at all with the quality and frame rate. Have a look for yourself in the sample video below. Note, because it’s on YouTube it’s obviously going to be compressed but I will get a download link to the source shortly.
Interestingly we found out that this box captures at native free view resolutions, for more information on this see the following link http://dtt.me.uk/
Rotating the iPhone to its horizontal position takes you into a full screen mode, the only thing you can do here is double tap the screen to zoom in, handy for broadcasts shown in non-widescreen format or for general zooming in on something. This does mean that if you want to record what you’re watching it’s a question of rotating the iPhone back to the vertical position. It does seem a touch bonkers that there is no way to record from the horizontal position, but it’s more a niggle than a drawback.
Once again we are faced with the issue of the digital signal that powers Freeview. Due to no fault of the box itself, some channels can look like the old RealPlayer dial up streams as many of the daytime channels are compressed to within an inch of their lives, just to make sure we can have our fill of shopping channels and not miss out. It’s when you start hitting the bigger channels like BBC you really see the quality shine through. Colors are exactly as you would expect watching tv on the iphone with smooth scrolling of panning shots.
There is an optional function to turn on a retina display function which really can make a difference on the new iPhone 4. The image comes across as being a lot sharper, crisper and even a touch more vibrant but this is at the expense of slowing down your phone a little.
Recording TV with Tizi
With the phone in its vertical position you can record a new program by pressing the record button, this will give you two options. Option one is to record indefinitely to the size of the available free space on your device, option two let’s you just record that program. Safety margins can be automatically applied so that recordings start and finish with some padding either side, to allow for timings and programs over running (Normally when Top Gear is on)
Playback of recordings is accompanied by the programme synopsis that is shown on the EPG. Recordings are only accessible via the Tizi application itself, unless you download them to your computer . Why this is I have no idea, as other applications seem to have the facility to record into the camera roll location but hopefully this will be addressed in a future software update.
Recordings aren’t accessible in the normal Camera roll location because they are direct captures of the freeview stream (.ts) and not a standard Mpeg2 format. That explains having to use the app to watch recordings.
Another annoyance shows itself when trying to watch your recordings, the application will still be searching for the Tizi. So if you are trying to save some battery life make sure you turn off your Wi-Fi and 3G
The film strip icon on the far right displays anything recorded along with the program synopsis and file details like size and length etc.
Accessing Recordings
Recordings are stored on the iPhone in their own area, so you can’t use the standard camera roll to view, as covered above recordings are accessed in Tizi application. To pull recordings onto your computer you need to fire up iTunes, go into the application sharing options, select what you want to synch and either do it manually or when syncing your iPhone.
An immeasurably better option would be if recordings were stored on the iPhone like other images and videos, in the camera roll location so you could use image capture to pull them easily instead of the iTunes faff. Even tho you couldn’t play them because of the recording format it would still make grabbing video to free up space more accessible. I do suspect that this is by design as you can use the TV tuner with their own desktop software called The Tube. Fortunately we will be reviewing this shortly.
Worth noting is the fact you can only delete recordings via the application itself and not via iTunes. So if you are wondering why you are running low on storage space remember to check your recordings.
Watching Live TV on Your Mac
This area seems to be the most overlooked part of any review for this box. In short, yes, you can watch TV on your Mac using the Tizi but alas this is something we are unable to test in our location. Its all the more a pity when you see what the tube software, designed to work with the Tizi, can offer an interactive form of television viewing experience. Keep an eye out for an upcoming review of The Tube from Equinux.
Roundup
It’s hard to see, or maybe not, where this product is aimed. Being an ex road warrior myself if I had a gizmo like this in the past I would of been a happy bunny indeed.
It’s hard to find any real shortcomings with the Tizi that aren’t related to issues of signal but there are a fair few annoyances. Viewing video using the app itself rather than using the camera roll is the main one and when in landscape mode it would be nice to have a record button.
On the plus side, the software is well thought out, intuitive with logical placing of information, making use of OTA data but not crowding the display.
How well the Tizi works in hotel environments or built up city areas is hard to tell. With the digital switch over in full effect this really shouldn’t be too much of a problem, but one to bear in mind as you can’t use an external aerial. (We did try holding the end of a roof top aerial to the antenna and almost got it to work)
It’s easy to look at the price of the Tizi and write it off straight away. However, when you take into account a Wi-Fi dongle can cost up to £50, a USB TV tuner can cost almost the same (for a half decent one anyway) and then the portability issue of lugging around a Mac with you, it doesn’t seem so expensive after all. Yes okay, there’s more flexibility with the Mac and a bigger screen but also added weight and all. Six of one and half a dozen of the other.
“An impressive small package that excels at exactly what it set’s out to do, provide TV on your iOS device and allow you to watch and record programs in an intuitive easy to use way”
Though very retarded and disorganized, creating a clean install without installing Snow Leopard first is fairly simple.
To download OSX Lion you do have to do it from a computer with Snow Leopard 10.6.6 and above (due to the app store condition). Lion will not be distributed on the physical media or anywhere else. (One of the ways how Apple wants to make everyone use Mac App Store).
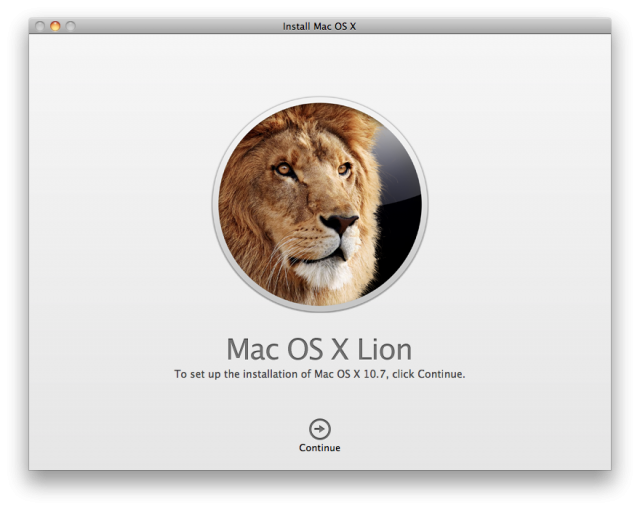
So, once you download OSX Lion it will automatically start the installation procedure.. before you click anything:
1. Go To Applications and find a filename called Install Mac OSX Lion.
2. Back That file to a hard drive or wherever just you have a copy so you can make a new DVD or USB when you need it
3. Now you need to right click on the above mentioned file and select Show File Contents
Right click and show Lion Package Contents
4. You will go into Contents folder and then Shared Resources and located a file called InstallESD
Locate the InstallESD file.
5. You can either burn this InstallESD.dmg with the Disk Utility but Lion installation from DVD drive can take forever. So it is recommended to use the USB stick.
To use USB Stick you will do the following in Disk Utility:
A) Locate USB stick on the left
B) Select it to be active
C) Click on the right side to RESTORE tab
D) Drag the InstallESD.dmg to the SOURCE textbox and drag the USB source to DESTINATION textbox, so it looks like this:
E) Hit Restore and wait until it’s done
When it’s done your USB stick is ready to be used as startup and install for OSX lion
6) Boot your Mac and hold the ALT key to pick the boot source
7) Choose your DVD with Lion or USB stick and you are on your way
Some of your questions sent in via the Yell US! Form
Q. How can I rip lion to USB?
A. Follow our guide above.
Q. How is Lions finder different?
A. Well, the first thing you will notice, is the lack of any colour on the standard menu items on the left-hand side. When you open mind in the new light on you will see the default screen is to show the most recently updated files in specific areas. There are of course LOTS more to finder than we’ve covered such as collapsing icons etc.
Q. How to check applications will run with lion?
A. There are a few websites that will list applications compatible with a Lion however our recommended method is to use Xslimmer and slim your applications to Intel only, preferably 64-bit. there are a few such as Billings that will complain they need a Java runtime. In situations like that just sit back and wait for an update. Here is our handy guide on how to check your applications are Lion compatible.
Q. What does the Mac OSX lion installation screens look like?
A. See our installation gallery here
For those interested in running Lion on a Hackintosh -based system that her a few projects coming up shortly where we will cover this. If anyone has an Nvidia graphics cards they would like to dedicate to the cause we would love you forever 😀
According to a Google+ post by Vic Gundotra, VP at Google, the official Google+ app for iOS should be rolling out “in the next few hours.” The app is actually available now, at the iTunes App Store.
Google+, Google’s contender in the Social Network war, was released only a few weeks ago and is already garnering millions of users and critical acclaim. The question of whether or not it can beat Facebook is on everybody’s minds, but it’s way too soon to know for sure. However, getting a timely release of an official iOS app is definitely a step in the right direction. It’s certainly the most successful social release by Google since they tried and failed (in most places) to create a social space for themselves with the ill-fated Orkut. A few more flops down the line, and it looks like Google might actually be getting its act together on this important front.
We haven’t seen any word about a Google+ iPad app, but we’re pretty sure that will be soon to follow. Facebook took its sweet time releasing an official iPad app, and Google will certainly want to cash in on that shortcoming. Google+ has tried to find ways to let people import their contacts and social connections from services like Google, but Facebook has always been conservative about letting their data go to other companies, and has tried to block Google from taking their data (and possibly users).
We are still in the midsts of reviewing our Elgato Tivizen so we noticed this press update straight away. What’s new?
Home Network Mode
Tivizen can now join your home Wi-Fi network! While you’re on the go, you can use Tivizen’s own Wi-Fi bubble to transmit the television signal as usual. But when you get home and power it on, Tivizen automatically appears in your home network and is available to all your devices – Mac, PC, iPad, or iPhone.
USB Mode
To tether, or not to tether? Now you have the choice. In USB Mode, no Wi-Fi connection is needed at all. Now you can connect Tivizen to a Mac or PC via USB and use it as a conventional TV tuner. That means you can work, surf or play on the Internet, and keep an eye on your favourite TV shows, all at the same time.
Performance Version 1.2 of the Tivizen app also delivers an enhanced user interface as well as optimized stability and overall performance improvements.
The Tivizen App Version 1.2 is available for free from the App store